Blossom beautifully with this free crochet headband pattern, designed to add a touch of floral elegance and charm to your everyday look!
Light Weight Crochet Lacy Headband
Super excited joy fills the air with the introduction of this patterns, adding a touch of elegance and charm to any ensemble. These beautiful accessories are not only fashionable but also versatile and functional. Made from soft, durable materials in a variety of vibrant colors and patterns, crochet headbands can seamlessly blend with different styles and occasions. The intricate stitch work creates a unique texture, making each piece visually appealing and distinctive. Whether it's a braided pattern, floral design, or simple yet elegant chain, these headbands exemplify the delicate beauty and creativity that crochet brings to life.

Their practicality extends beyond aesthetics, as they help keep hair in place while adding an extra element of style. Perfect for everyday wear or special occasions, crochet headbands offer an effortless way to elevate your look.
Tip:
Experiment with different yarns and hooks to achieve diverse textures and finishes.

How To Crochet Lacy Headband
Welcome to this detailed guide on making a beautiful crochet headband. This project is suitable for both beginners and experienced enthusiasts. Follow along, step by step, to create an elegant headband perfect for various occasions.
Materials Needed
- Cotonian yarn
- 3mm crochet hook
- Scissors
Step By step Guide
Step 1: Creating the Foundation Chain
- Start with a Slip Knot: Use your yarn to create a simple slip knot.
- Make the Chains: Measure from one ear to another to determine the length needed. Typically, this will be around 40 centimeters. Make the chains slightly loose, as they will contract slightly when crocheted.
- Measure Properly: Continue making chains until you reach the desired length, approximately 40-43 centimeters to account for shrinkage.

Step 2: First Row - Double Crochets
- Begin with Additional Chains: Add two more chains to start your first row of double crochets.
- Double Crochet Across: Skip one chain, and make a double crochet in the next. Make one chain, skip one chain, and insert a double crochet in the next. Repeat this pattern across the entire first row.
Step 3: Second Row - Continue Double Crochets
- Start the Row: Turn your work and chain three (two for the first double crochet and one for the space).
- Double Crochet in the Spaces: Insert your hook into the spaces created by the previous row (not into the stitches). Continue the pattern of one chain, one skipped space, and one double crochet.

Step 4: Third Row - Repeat the Pattern
- Turn and Chain: Again, turn your work, chain three, and continue the double crochet pattern.
- Complete the Row: Follow the same method—double crochet in the spaces, chain one, skip one—until you finish the third row.
Step 5: Single Crochet Edging
- Edge the Headband: Once the third row is completed, make single crochets all around the edges of the headband, ensuring neatness.
- Corners: At the corners, make one chain and reinsert your hook into the same space to maintain a square and tidy corner.
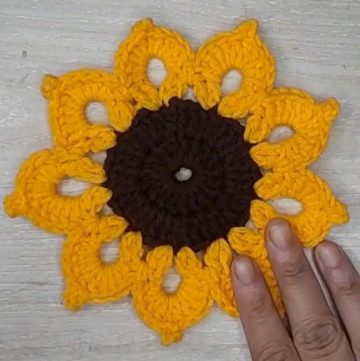
Step 6: Creating the Floral Pattern
- Position for Florals: Start from a corner on the front side of the headband.
- Begin the Petals: Chain four, skip two chains and insert a single stitch into the third. Repeat this four times around, ensuring flat, not ruffled, spaces.
- Turn and Triple Crochet: Yarn over twice, skip a space, and start making triple crochets in each space - chain four in between. The final set should have only one triple crochet as the starting chain four counts as one.

Step 7: Finishing the Petals
- Double Crochets in Spaces: On the front side, make seven double crochets in each space created by your triple crochets and secure with single stitches between each petal.
- Repeat: Repeat this pattern until the end of the row and secure the last petal with a single crochet.
Step 8: Completing and Detailing the Headband
- Final Touches: Make single stitches along the remaining edges to ensure everything is neat. Repeat the floral pattern as needed.
- Laces: Create chains (25 cm long) at both ends of the headband for tying. Make single stitches back along these chains.

Conclusion
You should now have a beautiful, unique crochet headband. This project is perfect for practice, allowing you to experiment with stitches and designs. Enjoy your handmade accessory and feel proud of your creative work!