
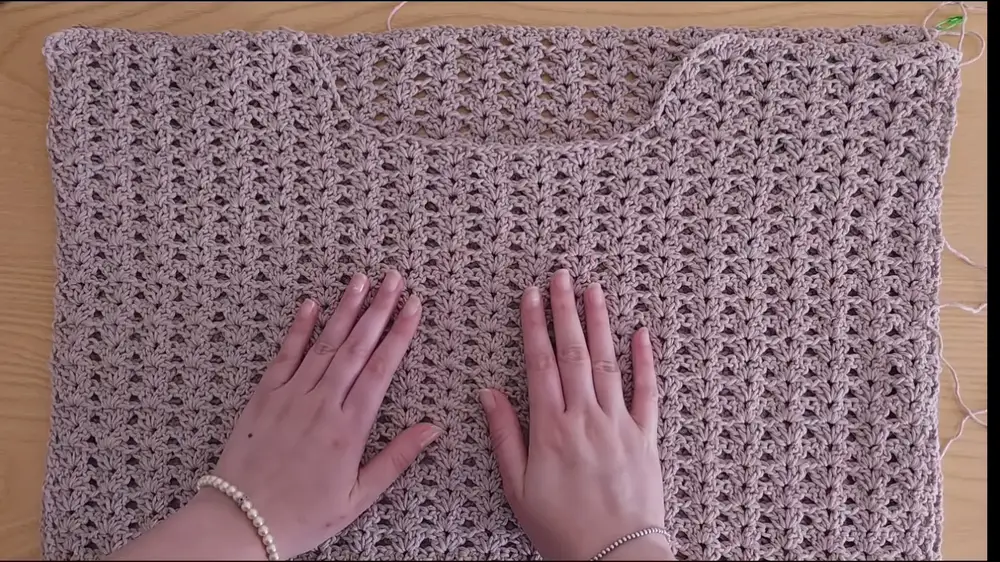
Stay effortlessly chic and cozy with this crochet sweater pattern, a trendy must-have for crafting enthusiasts this season!
Comfort and style come together perfectly with this Crochet Sweater Pattern. This cozy sweater brings warmth and charm to your wardrobe, making it ideal for any occasion. Whether you're relaxing at home or heading out, it adds a fashionable touch that works with jeans, skirts, or even layered over dresses. It’s not just another sweater—it’s the perfect mix of comfort and trendiness.
Crochet Trendy & Comfy Sweater

What makes this pattern special is how easy it is to personalize. Pick your favorite colors and yarn to make it your own. Plus, making the sweater is a calming and satisfying process, allowing you to learn and improve your crochet skills. It’s practical too—soft, durable, and made to handle regular wear while keeping you stylish. This pattern is perfect for cooler months, helping you stay warm without giving up on looking good. Simple, versatile, and unique—it’s an easy way to bring a handmade touch to your outfits while staying cozy and confident. Nothing beats the charm of wearing something made with care.
How To Crochet Trendy & Comfy Sweater
This project features a straightforward top-down t-shirt knitted in the round. The designer uses raglan increases and incorporates vibrant stripes of color. Whether you are returning to knitting after a break or a seasoned knitter, this pattern allows you to learn or refine your skills while producing a wearable and versatile piece of clothing. The steps include taking measurements, calculating stitches, knitting the body of the t-shirt, and finishing the sleeves and ribbed edges.
Materials:
- Yarn (multiple colors)
- Knitting needles
- Stitch markers
- Sewing needle
- Blocking materials (cardboard, pins, steam)
- Scrap yarn
- Crochet hook
- Measuring tape
- Calculator
Abbreviations of Stitches:
- K (Knit)
- P (Purl)
- M1R (Make One Right)
- M1L (Make One Left)
- St(s) (Stitch/Stitches)
- Stockinette Stitch
- Ribbing (1x1 Ribbing)
- Bind Off
Step by step Instructions
Step 1: Planning the T-Shirt Design
- The designer begins by taking key measurements:
- Shoulders
- Chest
- Waist
- Neckline (an estimated measurement based on the desired width, not the actual neck measurement).
- A rough sketch of the t-shirt is drawn, detailing the goal of using raglan increases and knitting the piece in the round from the top down.
Step 2: Gauge Swatch
- A swatch is critical for determining the gauge since the yarn used lacks detailed instructions.
- Follows a reference gauge of 26 stitches x 36 rows.
- Steps:
- Cast on 26 stitches using the long-tail method.
- Knit 36 rows.
- Block the swatch by pinning it to a piece of cardboard and steaming it.
- Measure the blocked swatch.
- Result: The gauge measured 21 stitches x 28 rows.
Step 3: Calculating and Dividing Stitches
- The neck circumference is slightly reduced for better fit (48 cm instead of the original measurement).
- The designer calculates the cast-on stitches using the gauge:
- Formula: 21 (stitches/10 cm) x 4.8 cm = ~100 stitches.
- Adjusts to an even number, casting on 100 stitches.
- The stitches are divided as follows:
- 32 stitches each for the front and back.
- 14 stitches for each shoulder.
- 2 stitches for the spaces between raglan increases.
Step 4: Starting the Collar
- Casts on 100 stitches using the pink yarn and joins them in the round.
- Works the knit one, purl one ribbing for the collar.
- The ribbing measures 5 cm and is folded over and joined for a neat edge.
Step 5: Beginning the Body
- Switches from ribbing to stockinette stitch after completing the collar.
- Places stitch markers for raglan increases:
- Divides the front, back, shoulders, and raglan points.
- Changes colors to red and begins the first stripe.
Step 6: Knitting the Colored Stripes
- Uses multiple colors for stripes:
- Pink (ribbing and base).
- Red.
- White.
- Dark blue.
- Light blue.
- Lilac (as the final color for the body).
- Notes about stripes:
- Adjusts stripe widths for variety.
- Uses a jogless join technique to create smooth transitions between colors (though it takes some trial and error to perfect).
Step 7: Placing Sleeves on Hold
- Reaches the desired point for separating the sleeves:
- Places shoulder stitches on scrap yarn to hold them.
- Adds stitches under the armholes for ease and continues knitting the body.
Step 8: Fixing Mistakes and Adjustments
- Encountered a dropped stitch while knitting the body.
- Repairs the issue with a crochet hook.
- Reviews and rechecks the work frequently for consistency.
Step 9: Completing the Body
- Knits the body to the desired length.
- Plans the bottom edging:
- Adds a few rows in lilac, followed by a ribbed hem in pink.
- Binds off the stitches using a long-tail method with a sewing needle for a rounded edge.
Step 10: Knitting the Sleeves
- Picks up stitches from scrap yarn to knit the sleeves.
- Closes the gaps under the arms carefully.
- Works the sleeve cuffs in a smaller needle for a tighter fit.
- Chooses to bind off the sleeves with a standard stretchy bind-off.
Step 11: Reworking the Bottom Ribbing
- Dissatisfied with the first attempt at the bottom ribbing, the designer unravels it and redoes it using:
- Smaller needles for a cleaner finish.
- Standard bind-off instead of the original rounded edge method.

Step 12: Final Touches
- Weaves in and secures all loose ends.
- Knots the tails for security before trimming.
- Blocks the finished t-shirt for a polished look.
Final Result
The completed t-shirt showcases clean stripes and a mix of bright colors. While the sleeves are slightly off in fit, the designer feels satisfied with the overall look and wearability of the piece. She considers it a great summer wardrobe addition.

Conclusion
This t-shirt project exemplifies the importance of patience, attention to detail, and the willingness to fix mistakes as they arise. Despite some challenges, the designer completed a beautiful and practical garment with thorough planning and creativity.


