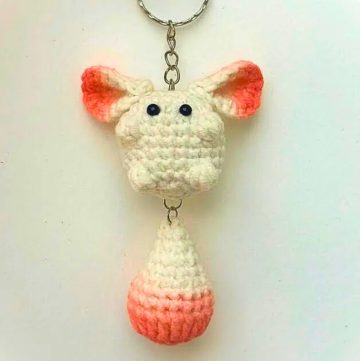
Charming and whimsical, this free crochet ladybird keychain pattern offers a playful and colorful way to brighten up your keys or bags, making every day delightful!
Cute & Easy Crochet Ladybird Keychain
Don't miss out on the chance to create something truly unique! This delightful crochet project lets you assemble a charming ladybird keychain that adds a whimsical touch to your accessories. You'll find detailed, easy-to-follow instructions that guide you through each step of making your ladybird, including spots, antennas, and tiny legs.

The pattern is designed to be approachable for all skill levels and comes with a comprehensive list of materials and clear diagrams to guarantee great results. Its compact size allows you to conveniently work on it anywhere, making it a perfect travel companion. Additionally, the completed ladybird keychain serves as a thoughtful handmade gift that will surely bring joy to friends and family. Bring some fun and color into your daily routine with this enjoyable and fulfilling project.
Tip:
For a more durable keychain, use a high-quality, 100% cotton yarn to ensure your ladybird lasts longer and retains its shape.

How to Crochet Ladybug Keychain
Here is a step-by-step guide describing the details presented in the provided pattern for making a cute crochet ladybug keychain. Follow along to create your very own adorable keychain!
Materials Needed
- Red and black 4-ply yarn
- Needles for sewing
- Scissors
- Keychain
- 2 mm crochet hook
- Pliers
The ladybug keychain described is crafted with minimal sewing, starting from the bottom of the body and working upwards.
Ladybug Body
Row 1
- Magic Ring: Create a magic ring and make 6 single crochet (sc) stitches into it.
Row 2
- Increases: Make 6 increases (2 sc into each stitch) for a total of 12 stitches.
Row 3
- Single Crochet and Increase: Alternate between 1 single crochet and 1 increase all the way around, finishing with 18 stitches.

Row 4
- Two Single Crochets and Increase: Alternate between 2 single crochets and 1 increase for a total of 24 stitches.
Row 5
- Three Single Crochets and Increase: Alternate between 3 single crochets and 1 increase to finish with 30 stitches.
Row 6
- Four Single Crochets and Increase: Alternate between 4 single crochets and 1 increase for a total of 36 stitches.
Row 7
- Change to Red Yarn: Switch to red yarn and work 36 single crochets in the back loops of each stitch to create a ridge.
Rows 8-9
- Normal Single Crochets: Do 36 normal single crochets all the way around for two consecutive rows.
Row 10
- Four Single Crochets and Decrease: Alternate between 4 single crochets and 1 decrease for a total of 30 stitches.
Row 11
- Single Crochets: Make 30 single crochet stitches.
Row 12
- Three Single Crochets and Decrease: Alternate between 3 single crochets and 1 decrease, resulting in 24 stitches.
Row 13
- Two Single Crochets and Decrease: Alternate between 2 single crochets and 1 decrease for a total of 18 stitches.
Stuffing
- Stuff the Ladybug: After completing row 13, stuff the ladybug.

Row 14
- One Single Crochet and Decrease: Alternate between 1 single crochet and 1 decrease for a total of 12 stitches.
Fasten Off
- Finishing Off: After row 14, fasten off, making sure the ladybug remains nice and round. Use a needle to sew into the front loops of each stitch and avoid the stuffing.
- Shape Adjustment: If needed, adjust the shape by pulling tight, making knots, and weaving the tail multiple times.
Ladybug Head
Start
- Magic Ring: Create a magic ring in black yarn and make 6 single crochets into it.
Row 2
- Increases: Make 6 increases to reach a total of 12 stitches.
Rows 3-4
- Single Crochets: Make 12 single crochets all the way around.
Attachment
- Sew the Head: Fasten off the head, leave a long tail for sewing onto the body and embroidering.
- Hide Color Changes: Hide the head-to-body color change by sewing the head on top of the color join.

Embroidery and Finishing
Wings and Dots
- Embroidery: Embroider a straight line (Y shape) from head to back for the wings, and create French knots for dots by wrapping yarn around the needle and pulling through.
Antennas
- Chains and Knots: Make slip stitches and 10 chains, knot them for durability, and attach to the center stitch of the head.
Keychain Attachment
- Attach Keychain: Use pliers to secure the keychain to the back or face of the ladybug by bending open a link, placing it through stitches, and closing it.
Conclusion
This easy-to-follow crochet project results in an adorable ladybug keychain that makes a perfect handmade gift or charming accessory. Customizable with different yarn colors and dot patterns, this project is suitable for crocheters of all skill levels.