
Turn heads this winter with a free, easy-to-follow Crochet Beanie Hat Pattern, showcasing unique fork cluster stitch details for a touch of charm!
Wonderful Crochet Beanie
Are you serious? You’ve never seen the crochet beanie that everyone is raving about? This elegant yet cozy design transforms a simple winter accessory into a stylish statement. Featuring the intricate fork cluster stitch, this beanie adds a sophisticated touch to your cold-weather wardrobe. Its flattering shape fits any head perfectly, offering both warmth and a fashionable look.

With various yarn and color options, you can effortlessly personalize each beanie to suit individual tastes. The clear, detailed instructions make it easy for both novices and experienced enthusiasts to achieve stunning results. Combining functionality with aesthetic appeal, this warm crochet beanie is destined to become a beloved staple in any collection.
Tip:
Use a slightly larger crochet hook for a softer, more flexible finish.

How To Crochet Beanie Hat
Materials Needed
- Worsted weight yarn
- Two crochet hooks: 4.5 mm for the brim and 5 mm for the body of the hat
Instructions
Step 1: Create the Brim
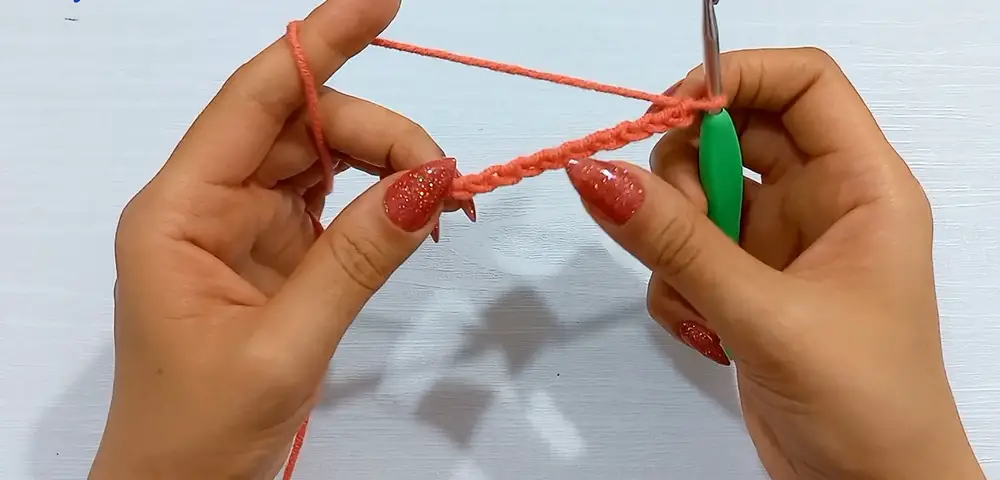
- Foundation Chain:
- Using the 4.5 mm hook, make one slip knot and 10 chains.
- Row 1:
- Skip the first chain, make a single crochet into the second chain, and one single crochet into each of the remaining chains (total 9 stitches).
- Skip the first chain, make a single crochet into the second chain, and one single crochet into each of the remaining chains (total 9 stitches).
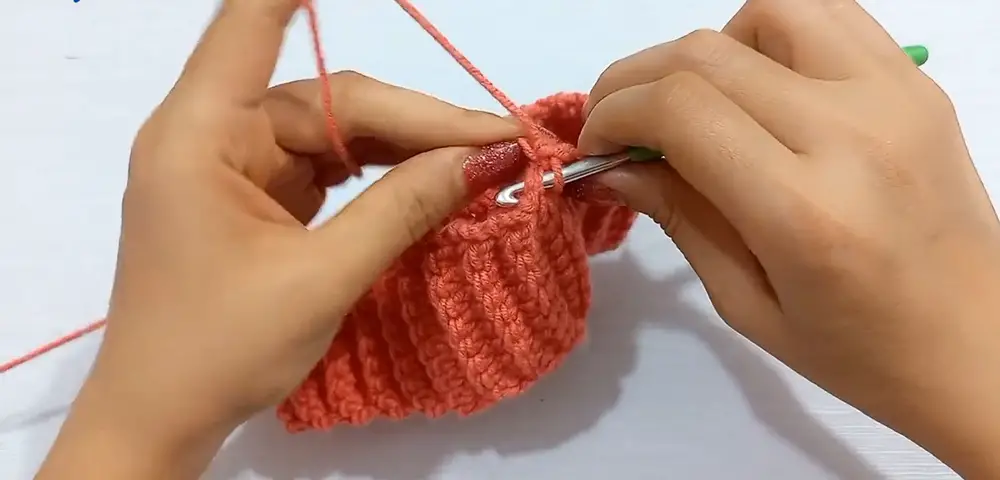
- Row 2:
- Chain 1 and turn the work.
- Make one single crochet under both loops of the first stitch.
- Make one single crochet into the back loop only of each of the middle stitches.
- Make one single crochet under both loops of the last stitch.
- Repeat Row 2:
- Continue making rows as per Row 2 until the length of the band reaches the desired circumference. Ensure the number of rows is a multiple of five.
- Join the Brim:
- Fold the band in half with the last row and first row together.
- Make slip stitches to join each stitch of the last row to the front stitch of the first row.
- Turn the work.

Step 2: Start the Body of the Hat
- Foundation Round:
- Switch to the larger 5 mm hook.
- Make one chain and one single crochet into the joining space.
- Make one single crochet at the top of each row of the brim until the end (total 60 single crochets).
- Make a slip stitch into the first single crochet to join the round.
- Double Crochet Round:
- Chain 3 (counts as first double crochet).
- Make one double crochet into each stitch of the previous round.
- Slip stitch into the third chain of the beginning chains.
- Forked Cluster Stitch Round:
- Chain 2 (does not count as a stitch).
- Make a front post double crochet around the first stitch.
- Skip the next stitch, make three double crochets over the next three stitches.
- Go back to the skipped stitch, make a front post double crochet around the next stitch.
- Repeat this sequence around.
- Slip stitch at the top of the first front post double crochet.
- Repeat Forked Cluster Stitch Rounds:
- Continue making rounds as per the Forked Cluster Stitch Round until the height from the brim to the top reaches the desired height (approximately 6 rounds).
- Continue making rounds as per the Forked Cluster Stitch Round until the height from the brim to the top reaches the desired height (approximately 6 rounds).
Step 3: Decrease the Top of the Hat
- First Decrease Round:
- Chain 2, make a front post double crochet around the first stitch.
- Skip the next stitch, make a decrease double crochet over the next two stitches.
- Make a double crochet into the next stitch, and then a front post double crochet over the previous skipped stitch.
- Continue the sequence across.
- Second Decrease Round:
- Chain 2, make a front post double crochet around the first stitch.
- Make a decrease double crochet over the next two stitches.
- Make a double crochet into the skipped stitch.
- Continue until the end.

- Final Decrease Round:
- Chain 2, make a front post double crochet around the first front post.
- Make a decrease double crochet over the next two stitches.
- Continue decreasing until the opening is small.
- Close the Top:
- Fasten off, leaving a long tail.
- Turn the hat inside out and weave through the top opening.
- Pull it to close the hole and securely weave in the ends.
Optional: Attach a Pom-Pom
- Attach a pom-pom at the top of the hat for added style and warmth.
Conclusion
Following these steps, you will have created a beautiful and easy crochet beanie hat. Adjust the size according to your preference and enjoy the warmth and style it brings.


