
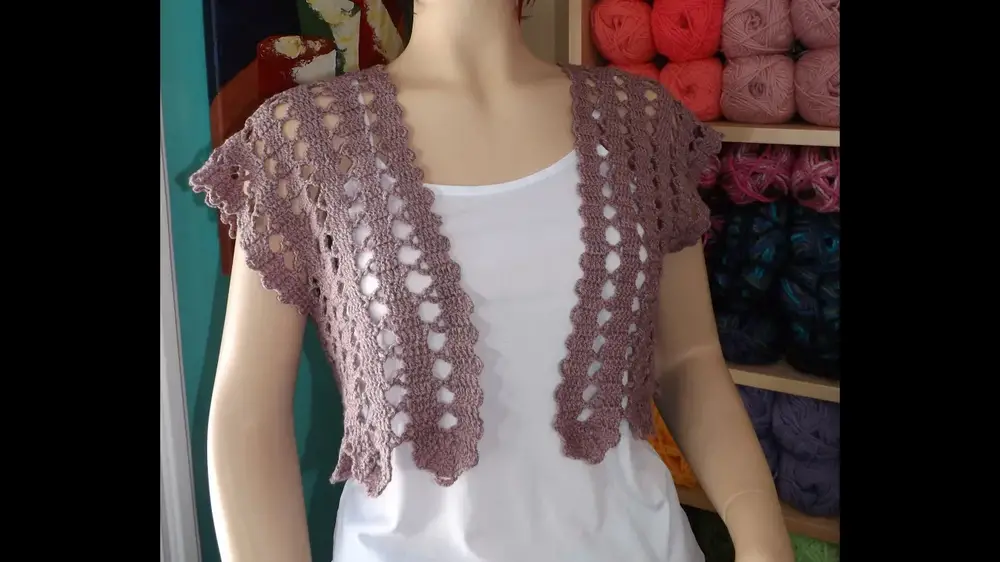
Elevate your summer wardrobe with a lightweight and stylish crochet cardigan, perfect for layering and adding a cozy charm to any warm-weather outfit.
Crochet Lightweight & Stylish Summer Cardigan
A lightweight crochet summer cardigan is the perfect addition to your wardrobe, offering a blend of comfort and style for those warm days and evenings. Designed for maximum versatility, it’s an ideal layer over a sundress during picnics, casual outings, or even a stroll along the coastline. The open stitch design makes it breathable and light, ensuring you stay cool while keeping a polished look. Its relaxed fit and customizable color choices make it a go-to piece that pairs effortlessly with shorts, flowing skirts, or even jeans.

This crochet cardigan is more than just a seasonal layer; it redefines practicality with an elegant edge. Perfect for travel, it folds easily and is ready to add charm to any outfit throughout your day. Its handcrafted appeal promotes mindfulness and creativity, allowing space for personalizing every detail for perfect results. Easy to follow, this pattern is suitable for beginners yet satisfying enough for experienced crocheters looking for a relaxing project.
How To Crochet Summer Cardigan
This pattern covers the process of making a crochet summer cardigan using a step-by-step approach. The project uses simple materials and crochet techniques to create a versatile cardigan pattern that can be adjusted for different sizes. In this pattern, the focus is on creating the top portion of the cardigan, which can function as a standalone vest or serve as the base for adding length and sleeves in the next phase.
1. Materials Needed
- Yarn: Loops & Threads yarn (85% acrylic, 15% nylon), 100g per skein. You’ll need about 200g for the project. The demonstrated color in the tutorial is "Rose."
- Crochet Hook: 3.5mm
- Scissors
- Tapestry Needle (to weave in tails)

2. Starting the Top Portion (Brookes Lace Motif)
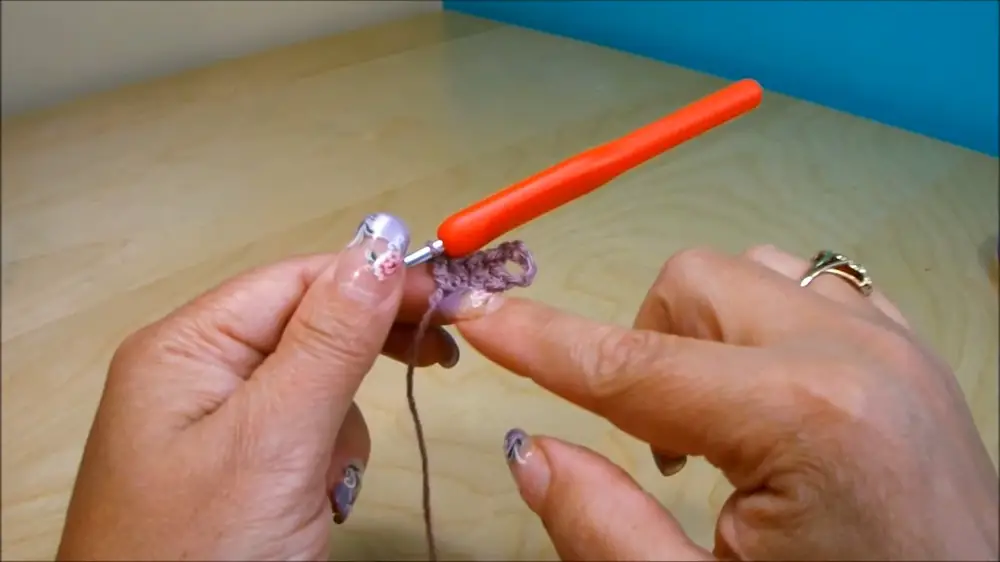
A. Create the Initial Chain
- Begin with a slipknot.
- Chain 9 stitches.
B. Work Double Crochets
- Yarn over, count to the 6th chain, and insert the hook.
- Create four double crochet stitches in separate chain spaces.
- You’ll have a total of 5 loops (chain 5 + 4 double crochets).
3. Building the Brookes Lace Pattern
A. Continuation of Rows
- Chain 5, turn your work, and create a double crochet on top of each of the four double crochets from the previous row.
- Repeat the process to create a strip of loops.
B. Adjusting Width (Optional)
- You can make the strips wider by increasing the chain and adding more double crochets, but keeping it simple with 4 preserves proportion.
4. Creating Loops for the Back and Front
- Continue working the Brookes lace strip until you have 16 loops for the back shoulder section. This will form the top half above the arm opening.
- Use a measuring tape to determine the size needed for your armhole. (Example: 18 cm for a large).
5. Joining Chains Under the Arm
A. Identify Loops to Close
- Use markers at the 10th loop (from both the back and shoulder sections) as a guideline for where to close the loops under the arms.
B. Closing Loops
- Chain 2.
- Start with a half double crochet in the 10th loop where the marker is.
- Attach the loops together under the armhole using single or half double crochet stitches.
- Continue working downward to create the piece.
6. Building One Side of the Cardigan
- Work back and forth, creating loops until half the cardigan body is completed.
- Attach fewer loops in the top collar section for a more defined finish than the bottom portion (leave only 1 loop at the top versus 3 for the bottom).
7. Completing the Front Section
- Once the back portion is finished, work additional loops to create the front panels.
- Ensure symmetry by matching the number of Brookes lace loops to the back portion (e.g., 22 loops).

8. Closing the Underarm Section
- When both front and back panels are complete, attach the two sides together under the arm using the same method described earlier.
- Align loops using markers to close evenly.
9. Final Adjustments
- Align uneven ends by chaining 4 and slip stitching into the last double crochet on both sides.
- Weave in all tails using a tapestry needle and ensure neat finishing.
Conclusion
You now have the completed top portion of the crochet summer cardigan, which can act as a standalone vest or the foundation to add length and sleeves. The method is simple yet elegant, and the Brookes lace motif adds an airy, decorative touch perfect for summer wear. This is a versatile design that can be adapted to various sizes and styles as needed.


