
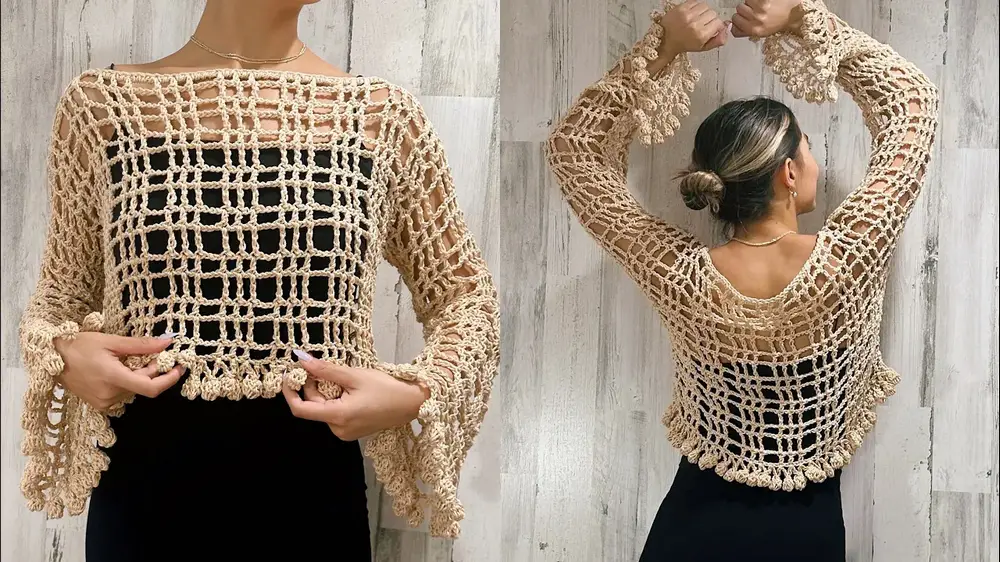
Add a stylish Crochet Mesh Top Calado with pompom details to your wardrobe. Versatile, chic, perfect for any size and ideal for casual outings.
Crochet Top Calado Pattern
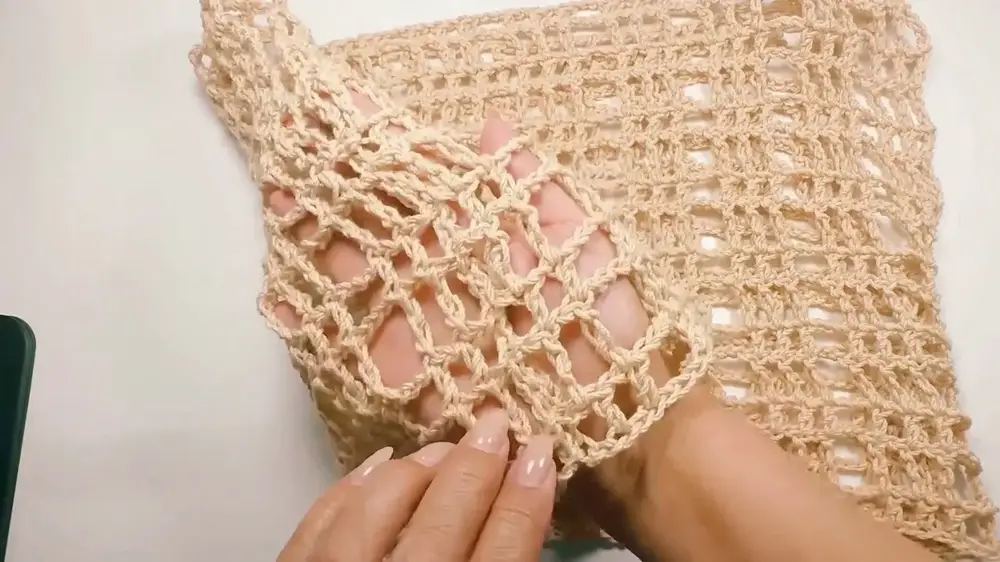
Create a stylish and breezy addition to your wardrobe with the Crochet Mesh Top Calado featuring playful pompom details. This versatile top offers a chic and comfortable fit for any size, thanks to its adaptable pattern and easy adjustments. The openwork design consists of a multiple of 8, providing a light and airy texture that drapes elegantly over the body. Flared sleeves and a pompom-accented hem add a playful touch, while the top is effortlessly finished with a neat, single crochet neckline. Perfect for casual outings or beachwear, it's sure to become a wardrobe favorite.

Why Love This Pattern?
This pattern is wonderful for several reasons:
- Adaptability: The pattern is a multiple of 8, making it incredibly easy to adjust to any size. You can tailor it precisely to your measurements by increasing or decreasing the number of chains and rows.
- Simple Construction: The pattern follows a straightforward process with clear steps, making it easy to follow even for beginners. The repetition of rounds with double crochets and double treble crochets means you can quickly get the hang of the stitch pattern.
- Beautiful Design Elements: The pattern includes charming details such as flared sleeves and pompom embellishments at the edges. These touches add a playful and stylish flair to the finished piece.
- Finishing Touches: The inclusion of a round of single crochets around the neck adds a neat finishing touch, enhancing the overall look and durability of the blouse.
How To Crochet Top Calado
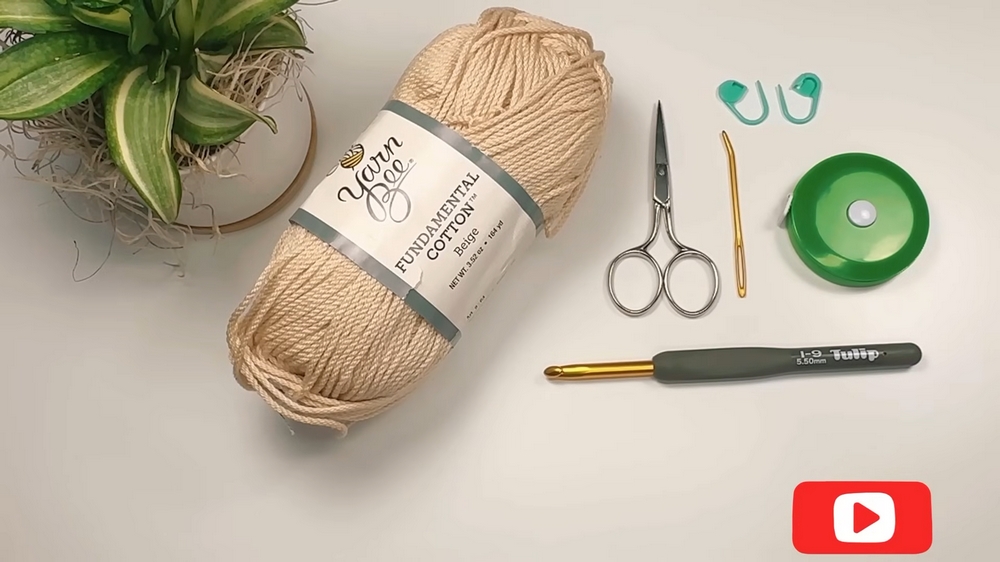
Materials Needed:
- Yarn: Jarvie Funda Goton yarn in beige
- Hook: 5.50 mm crochet hook
- Additional: Scissors, a wool needle, markers, and a measuring tape
Pattern Details:
This blouse is a multiple of 8 and can be adapted to any size by measuring the bust and adding 2-4 inches for looseness. The following instructions will create a small size blouse.
Starting Chain:
- Foundation Chain: Ch 72 to achieve a width of 18 inches.
Crochet the Body:
- Row 1:
- Skip the first 5 chains.
- In the 6th chain, make a double crochet (dc).
- (Ch 1, skip next ch, dc in next ch)
- Repeat - twice.
- (Ch 3, skip next 3 ch, dc in next ch)
- Repeat -.
- Continue this sequence until the end of the row.

- Row 2:
- Ch 4 (counts as 1 double-treble crochet and ch-1 space), turn.
- (Yarn over twice, dc in next dc, ch 1)
- Repeat - across, working dc into each dc.
- (Ch 3, yarn over twice, dc in next dc)
- Continue this sequence until the end of the row.
- Row 3:
- Ch 3 (counts as 1 dc), ch 1, turn.
- (Dc in next dc, ch 1)
- Repeat -
- (Ch 3, dc in next dc)
- Continue this sequence.
Repeat Pattern:
- Subsequent Rows: Alternate between the pattern for Row 1 and the pattern for Row 2 until there are 15 rows or until it reaches a height of 13 inches.
Creating the Neck Opening:
- Neck Opening:
- When you reach the required height, divide the piece in half, and create an opening measuring 11 inches by working only on each side separately.
- For the next row, follow the pattern until you reach the marker indicating the neck opening, then chain 43 for the neck opening and continue the pattern on the other half.
Continue with the Back:
- Back Half:
- Continue the same pattern as the front, with 15 additional rows to match the front height.
- Leave an 8-inch space for the armhole.

Joining the Sides:
- Seaming:
- Turn the piece inside out and seam the sides, leaving an 8-inch space for the armhole.
Sleeves:
- Start Sleeves:
- Begin at the union, ch 3, (ch 1, dc in next space), repeat for the sleeve.
- Alternate Rows:
- Follow the pattern for alternating dc and double treble rounds until reaching the elbow height (9 rows).
- For Round 10, increase the chain space from 3 to 4 chains.
Finishing the Sleeves:
- Complete Sleeves:
- Finish the sleeve with rounds of alternating dc and double treble crochets.
- End with 2 additional rounds of dc.
- Add Pompoms:
- To make pompoms, ch 3, (in the third ch from the hook, work 3 unfinished dc, yarn over and pull through all loops), ch 3, slip stitch into the next space.
Finishing Edges:
- Bottom Edging:
- Repeat the pompom pattern around the bottom, attaching to the main body with slip stitches in corresponding chains.
- Neck Edging:
- For a neat finish, work a round of single crochets around the neck opening.
Final Touches:
- Weave in Ends:
- Hide all loose ends with a wool needle.
- Blocking (Optional):
- Block the finished blouse to size if desired to enhance stitch definition.
Enjoy your new crocheted blouse! Don't forget to share your creation and support the channel by liking and subscribing.


