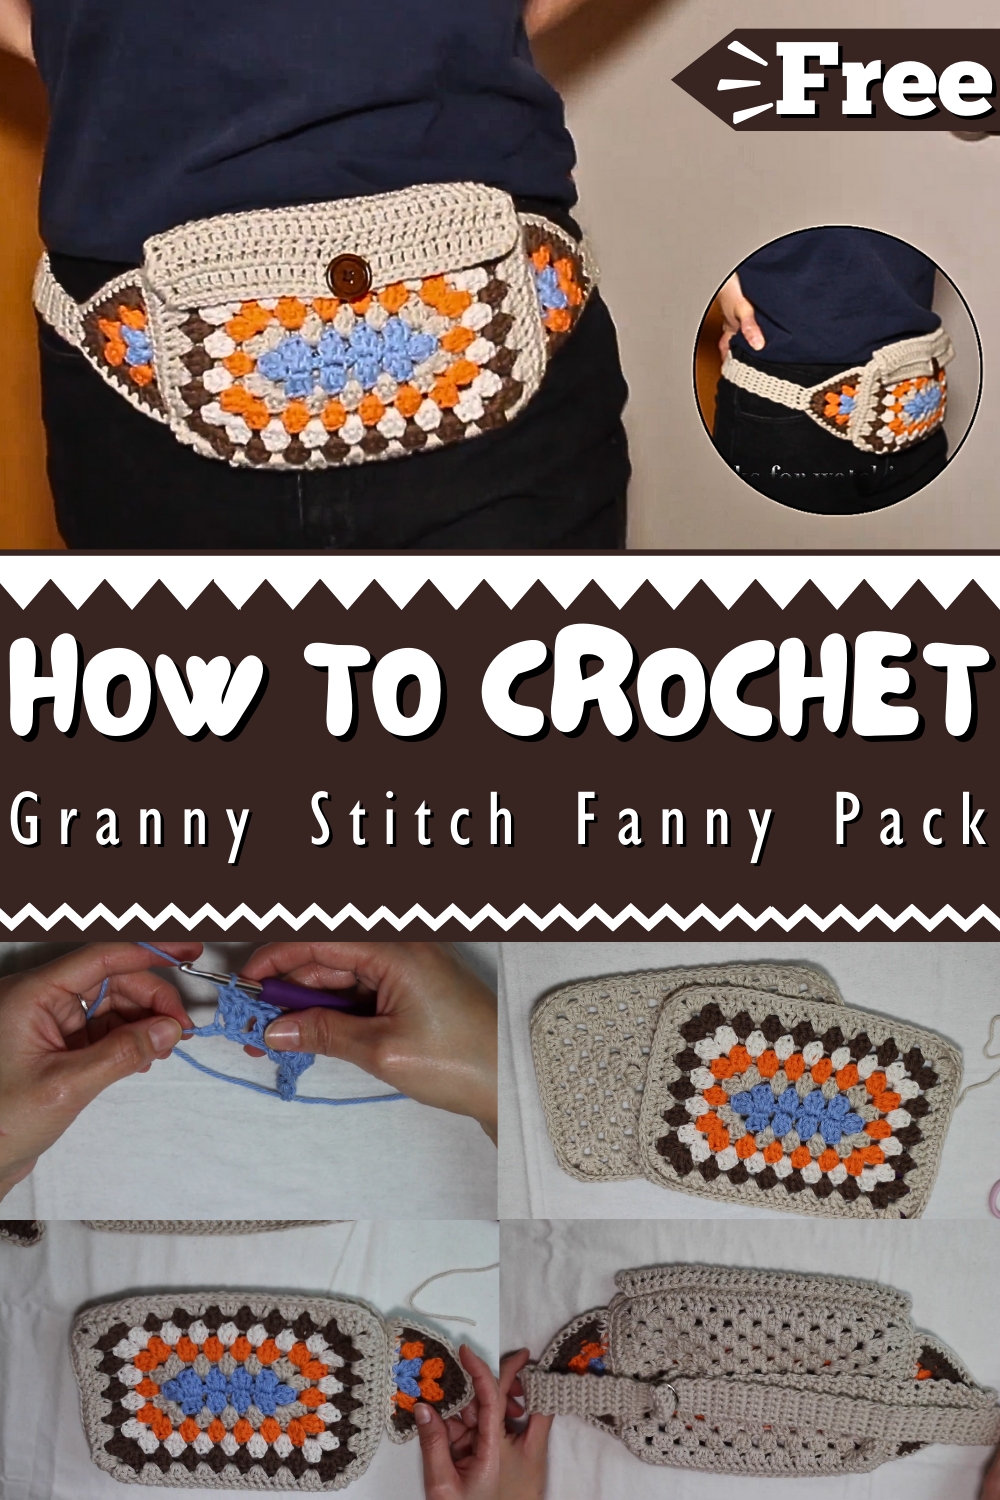
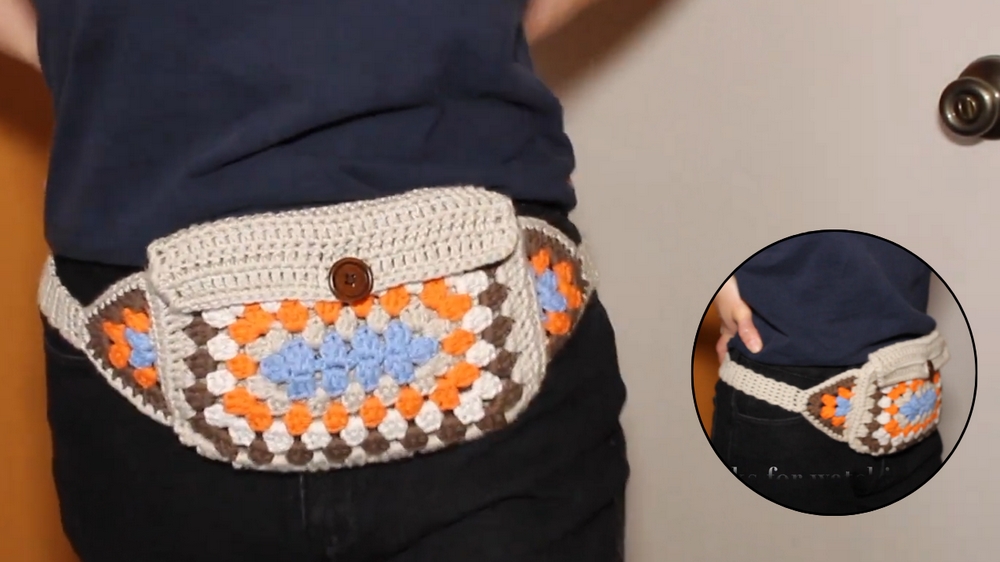
Elevate your accessory game with our Crochet Granny Stitch Fanny Pack Pattern, a delightful fusion of classic crochet and contemporary convenience!
Fanny packs have long been a symbol of practicality and convenience, but the Crochet Granny Stitch Fanny Pack Pattern brings an artistic twist to this essential accessory. Combining traditional crochet techniques with modern functionality, this pattern creates a stylish yet practical bag. The granny stitch, with its distinctive texture and timeless appeal, lends a unique aesthetic, making each fanny pack not just a storage solution but a fashion statement.
Crochet Granny Stitch Fanny Pack
Ideal for any occasion, from casual outings to travel adventures, this fanny pack holds essentials like keys, wallets, and phones securely and within easy reach. Its lightweight design and adjustable strap ensure comfort, while the durable crochet material promises longevity. The granny stitch pattern also allows for customization with colors and yarn types, enabling personalization to match any wardrobe.
How To Crochet Granny Stitch Fanny Pack
Follow along with this step-by-step guide to make your stylish and functional fanny pack using granny stitching techniques. Perfect for beginners and intermediate crocheters alike!
Materials Needed
- Yarn
- Five colors of medium-weight (size 4) yarn for panels and straps
- Single color for borders (optional)
- Crochet Hook
- Recommended hook size: 5.0mm (H/8)
- Tapestry Needle
- For sewing panels and attaching straps
- Two Metal D-Rings
- For the strap mechanism
- Sewing Needle & Thread
- For attaching the button
- Button
- Used to secure the flap
- Scissors
- For trimming and finishing ends
Abbreviations of Stitches
To keep the instructions concise, familiarize yourself with these abbreviations:
- ch: Chain
- dc: Double Crochet
- sc: Single Crochet
- sl st: Slip Stitch
- hdc: Half Double Crochet
- dec: Decrease
Construction Overview
The fanny pack is constructed as follows:
- Front Panel – Rectangle foundation of granny stitch.
- Back Panel – Rectangle foundation, similar to the front panel.
- Top Flap – A smaller rectangle flap with a single crochet border.
- Two Side Triangle Panels – Created using granny stitches.
- Short Strap + Long Strap – Attach using two D-rings for adjustability.
- Final Assembly – Whip stitch panels together and add finishing pieces.
- Optional Lining – Suggested fabric lining for stability.
Step-by-Step Instructions
Front Panel
- Foundation Row
- Using Color 1, chain 12 + 3.
- Row 1:
- In the fourth chain from the hook, add 2 dc, chain 2.
- In the next stitch, add 3 dc.
- Skip 2 stitches, and in the third, repeat with 3 dc.
- Continue this until your second-to-last stitch where you add 3 dc.
- Form the corner by chaining 2, and in the last stitch, add 3 dc followed by another chain 2.
- Repeat rows until you have 6 rows. Change colors for each row in the sequence (Color 1 → Color 2 → Color 3 → Color 4 → Color 5 → Color 2 for the last row).
- Border
- Using the same color as Row 6, chain 1 and add 1 hdc stitch around the rectangle to form a border. Slip stitch to the first chain to close.
Back Panel
- Follow the exact same instructions as the front panel, with the difference being that it is made entirely in one solid color (Color 2).
- Add a half-double crochet border after completing the granny stitch rows.
Top Flap
- Foundation Row
- Chain 29 + 2.
- In the third chain from the hook, add 1 dc. Continue adding 1 dc in each chain space for a total of 30 dc.
- Rows 2-4
- Chain 2, turn your work, and repeat 30 dc across for each row.
- Border
- After completing row 4, chain 1 and add 1 sc around the entire rectangle. Slip stitch to the first chain at the end to complete.

- After completing row 4, chain 1 and add 1 sc around the entire rectangle. Slip stitch to the first chain at the end to complete.
Short Strap
- Attach 2 D-rings together by crocheting directly onto the straight edge:
- Add 5 sc around the curve of the D-rings.
- Work rows of 5 sc until you reach the desired length (typically 18 rows for a strap that measures 5 inches).
Long Strap
- Chain 5 + 1 for turning.
- Work rows of 5 sc for 90 rows.
- Row 91: Begin tapering by adding 1 sc dec followed by 1 sc, then another 1 sc dec.
- Row 92: Continue tapering by adding 1 sc dec, followed by 1 sc, then finish off.
- One end of the strap will have a decorative tapered finish.
Side Triangle Panels
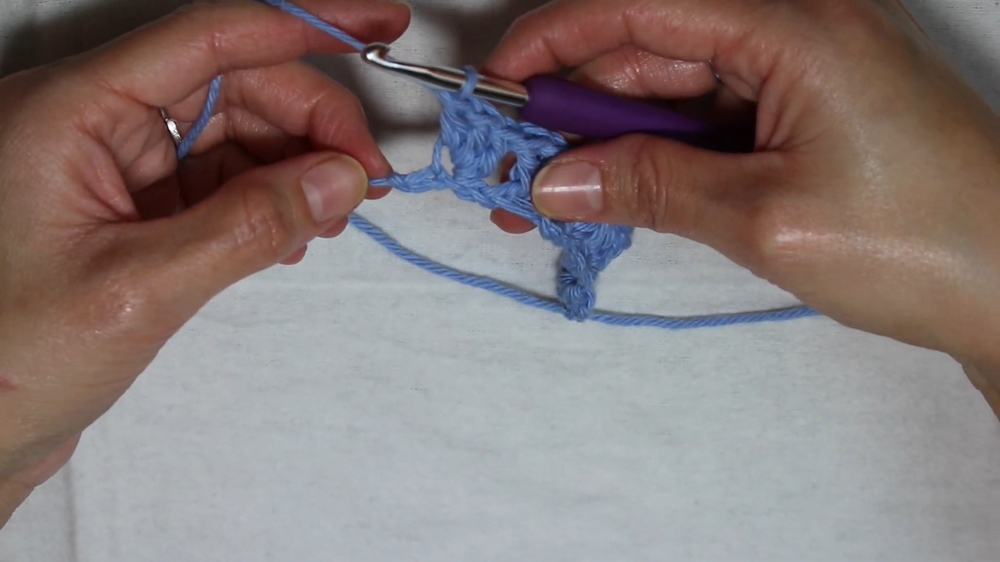
- Start with a magic ring and chain 3. Add 3 dc, chain 2, then add 4 dc into the ring.
- Row 2: Tie on another color, chain 3, and in each gap between stitches, add 3 dc clusters. At the corner, add 3 dc, chain 2, and another 3 dc in the same space.
- Row 3: Repeat Row 2.
- Finish with a single crochet border around the triangle.

Make 2 triangles for the sides.
Assembly
- Attach Front & Back Panels
- Align the panels' edges with right sides facing. Use front loop-back loop technique to slip stitch in a U-shape, leaving the top open.
- Attach Side Triangles
- Use a tapestry needle and yarn to whip stitch each triangle into the inset divots created between front and back panels.
- Attach Top Flap
- Align the flap with the back panel top edge. Slip stitch along the row to secure.

- Align the flap with the back panel top edge. Slip stitch along the row to secure.
- Attach Straps
- Whip stitch the short strap to one triangle panel edge and the long strap to the opposite triangle edge.
- Sew Button
- Locate the fourth row of the front panel and sew on the button.
- Locate the fourth row of the front panel and sew on the button.
Conclusion
Your granny stitch fanny pack is complete! This handmade accessory is perfect for carrying essentials while adding a touch of crochet art to your wardrobe. Consider lining the inside with fabric to improve durability and prevent snagging. Adjust the strap using the D-rings for a custom fit. Enjoy your new creation!
Notes
- This project is beginner-friendly but involves multiple components. Take your time assembling each piece carefully.
- Feel free to customize colors and adjust the dimensions to your needs.