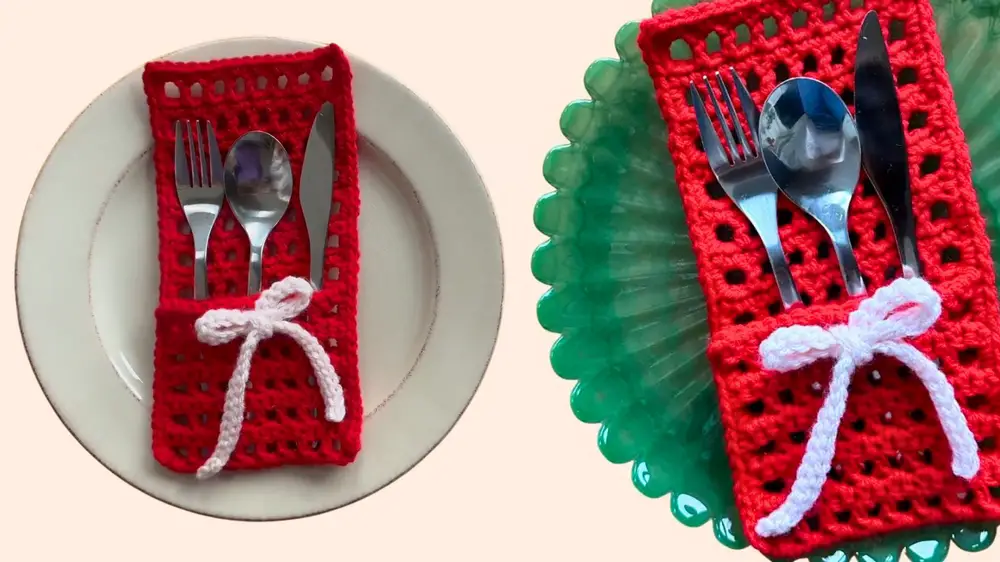
Add charm and functionality to your table with reusable crochet cutlery holders—perfect for organizing utensils, gifting, and enhancing any dining setting.
Crochet Cutlery Holder Pattern
Setting the table for a special occasion often involves those small yet meaningful details that bring everything together. A free crochet cutlery holder pattern offers a wonderful way to add elegance and practicality to your table. These holders are not just decorations; they serve to organize your utensils in a stylish manner, keeping everything tidy and easy to access. Perfect for gatherings, holidays, or even daily meals, they can be customized in endless colors and patterns to fit any theme or season.

Beyond traditional table settings, they work as thoughtful additions to gift baskets, unique wedding favors, or even as mini pouches for small keepsakes. One of their greatest benefits is their sustainability—they’re reusable, washable, and far more eco-friendly than disposable options. Plus, they’re simple enough to make quickly while being versatile in use.
Enhancing a quiet family dinner or impressing guests at larger celebrations, these cutlery holders add a personal touch that reflects care and attention to detail. Combining function and charm, they’re a budget-friendly way to upgrade your dining aesthetic while contributing to a greener lifestyle. With this pattern, even the simplest meals can look extraordinary.
How To Crochet Christmas Cutlery Holder
In this pattern, you'll learn how to create an adorable crocheted cutlery holder. Perfect for hosting dinner parties or elevating everyday meals, this elegant and functional project is simple and ideal for beginners. Gather your supplies and follow step-by-step instructions to crochet the piece to your desired size.
Supplies Needed
- Acrylic yarn (Size 4) in two colors
- 4.5 mm crochet hook
- Scissors
- Yarn needle
- Stitch marker
Steps to Crochet the Cutlery Holder
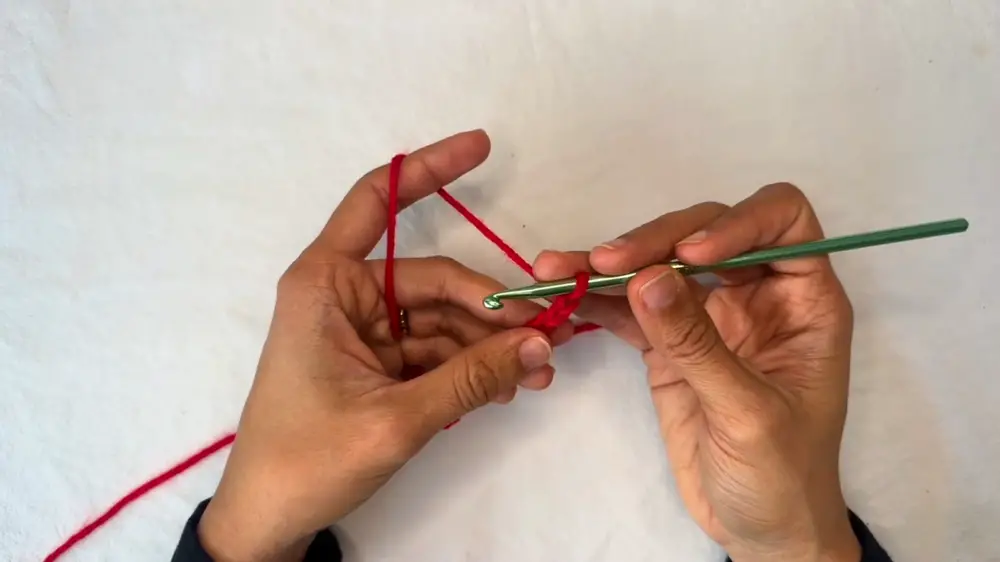
Step 1: Start with a Slip Knot
- Leave a small yarn tail and wrap the yarn around your fingers twice.
- Take the strand behind, pull it forward, and repeat until you’ve formed a knot.
- Adjust the slip knot by pulling the working yarn until it’s tight enough to insert your hook.
Step 2: Make the Foundation Chain
- Chain a total of 18 stitches. This chain sets the width of your cutlery holder.
- Once finished, proceed to the first row.
Step 3: Row 1 (Single Crochet Across)
- Insert the hook into the second chain from your hook (loop on hook doesn’t count).
- Work a single crochet:
- Insert hook into the chain, yarn over and pull up a loop (2 loops on hook).
- Yarn over and pull through both loops.
- Repeat single crochet for each chain until the end of the row.
- Finish Row 1 and turn your work.
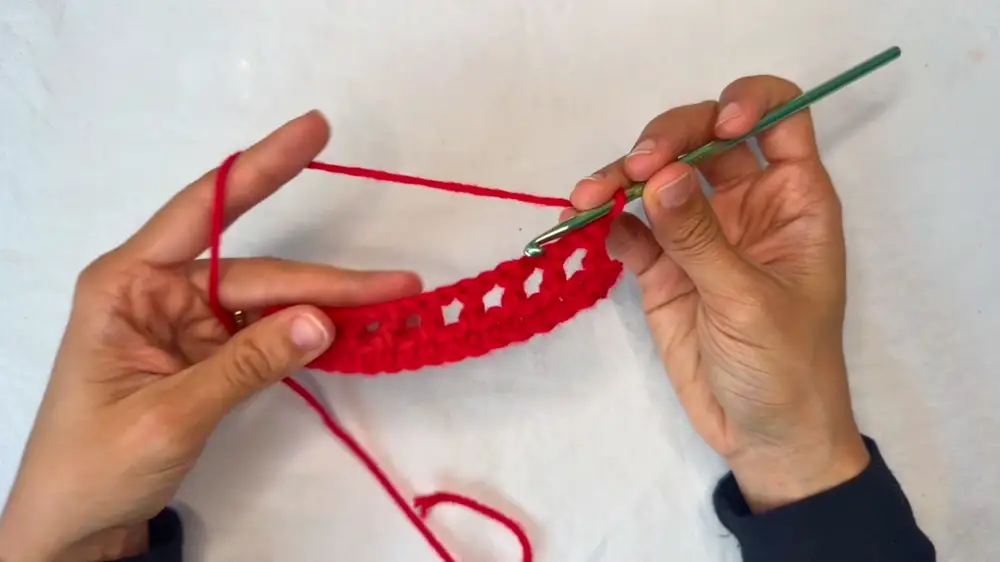
Step 4: Row 2 (Create Openwork Pattern)
- Chain 3 and flip your work.
- This chain counts as one double crochet and one chain space.
- Skip the first two stitches; work a double crochet into the next stitch:
- Yarn over, insert hook into the stitch, yarn over and pull up a loop (3 loops on hook).
- Yarn over, pull through two loops, and yarn over again to pull through the last two loops.
- Repeat the pattern:
- Chain 1, skip 1 stitch, and work a double crochet into the next stitch.
- Continue chaining 1, skipping 1, and double crocheting all the way down.
Step 5: Row 3 (Single Crochet Across)
- Chain 1 and flip your work.
- Work one single crochet on top of each double crochet from Row 2.
- For chain spaces, work one single crochet around the chain space. Alternate between crocheting into stitches and chain spaces.
- At the end of the row:
- Place a single crochet around the turning chain space.
- Insert your hook into the second chain from the turning chain and finish with a single crochet.
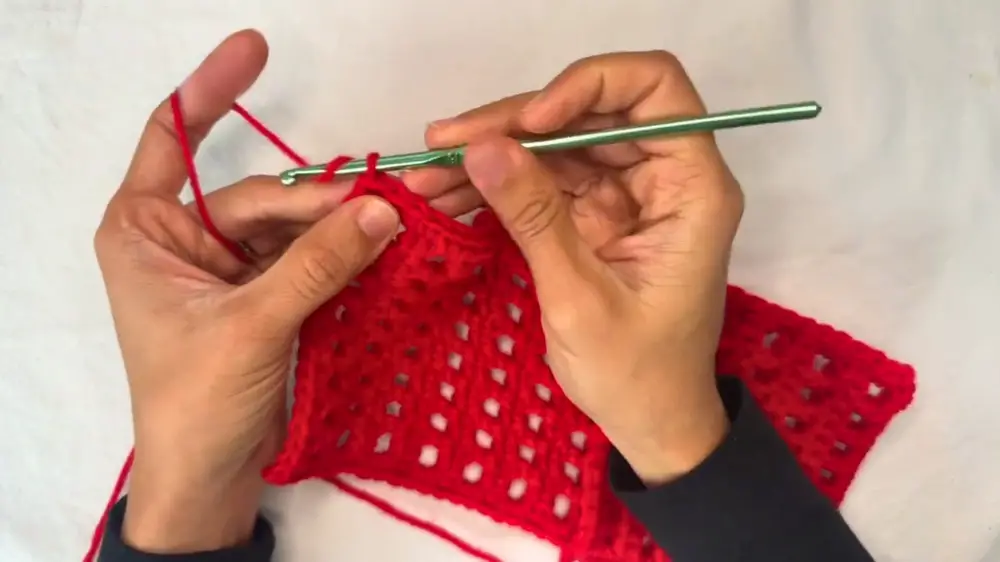
Step 6: Repeat Rows 2 and 3
Continue alternating Row 2 and Row 3 until your piece reaches the desired length.
- Measure it to ensure that the cutlery fits comfortably when folded into a holder.
Add the Border and Sew the Sides
Step 7: Create a Border
- After finishing the last row of single crochet, chain 1 and start working along the sides.
- For rows of single crochet, work 1 single crochet into the sides.
- For rows of double crochet, work 2 single crochets into the sides. Repeat this method down the entire side to create a clean edge.
Step 8: Stitch the Holder Together
- Fold the piece so you can identify where it needs to be sewn into a pocket form.
- Use a stitch marker to align the front and back rows to ensure accuracy.
- As you work along the border, perform single crochets that connect the two sides to close the edges.
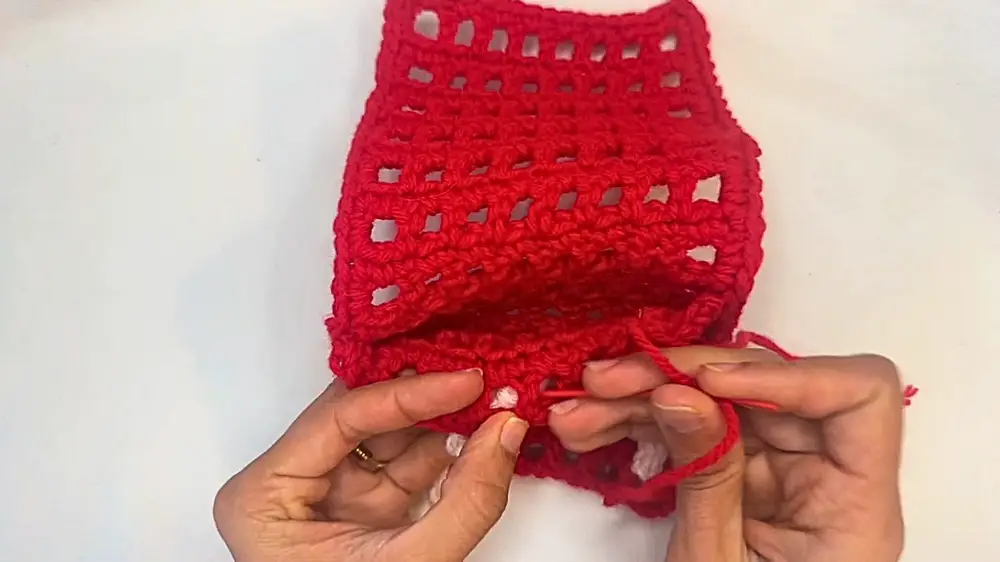
Step 9: Finish and Secure Edges
- Cut your yarn, leaving a tail to weave through.
- Tie a knot and weave the tail through the stitches to secure any loose ends.
Create the Decorative Bow Tie
Step 10: Crochet the Bow Tie
- Using your second color of yarn, create a slip knot, and chain 60 stitches.
- To create a thicker cord, work slip stitches along the back bumps of the chain:
- Insert your hook under the back bump, yarn over, and pull through both loops.
- Continue slip stitching all the way down and finish the row. Cut off the yarn and weave the ends.
Step 11: Form the Bow
- Fold the cord and tie it into a bow, adjusting it to your preference.
- Make sure the tails of the bow are even, and the bow is centered.
Step 12: Attach the Bow
- Locate the center of the cutlery holder (count stitches or holes for accuracy).
- Using yarn and a needle, sew the bow securely onto the holder.
- Tie knots and weave through stitches to ensure the sewing isn’t visible from the front.
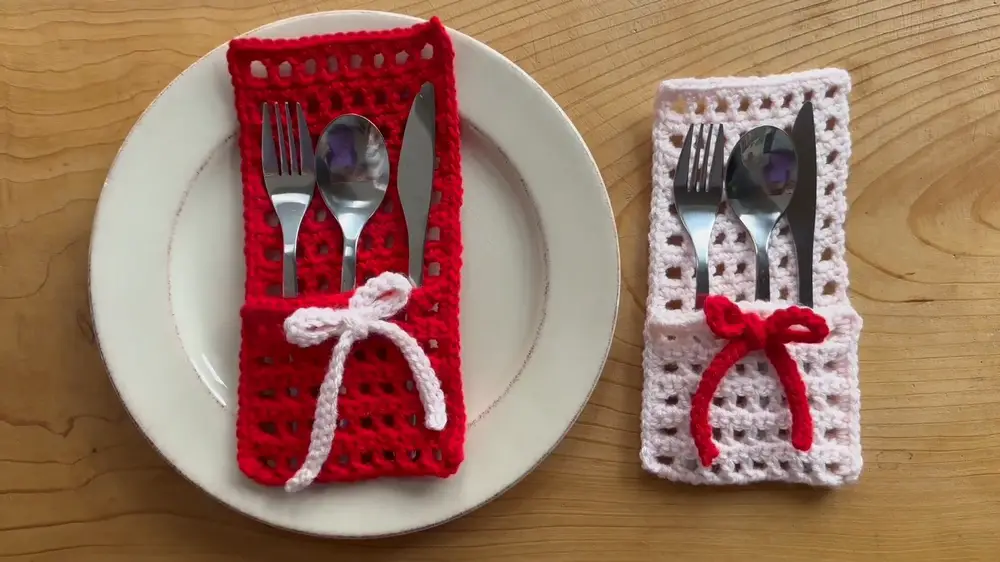
Conclusion
Congratulations! You’ve created a charming crocheted cutlery holder complete with decorative touches. This project is versatile—perfect for gifting, dinner parties, or adding custom flair to your dining table. Customize the size, colors, or bow shape to suit your preferences. This simple yet stylish design is a fun way to level up your crochet skills!