Brighten up your car with cute strawberry and daisy-themed crochet hangers, perfect for adding charm and holding small essentials during every drive.
Crochet Cute Strawberry Car Hanger
A car ride becomes a little brighter with the charming touch of strawberry and daisy-themed crochet hangers. These delightful accessories offer both beauty and functionality, serving as a lovely addition to your vehicle. Designed to hold small essentials like air fresheners, lightweight keepsakes, or even gentle reminders, they blend practicality with a pop of personality. The strawberry and daisy editions stand out for their playful yet graceful designs, each bringing a refreshing splash of color and nature-inspired charm to your car’s interior

More than just ornaments, these crochet hangers are thoughtful gifts that resonate with anyone who appreciates handmade wonders. They add a cheerful element to everyday drives while keeping small items organized and accessible. Simple to make, the pattern offers crocheters an engaging project and provides a chance to repurpose yarn scraps in an eco-friendly way.

Whether displayed on the rearview mirror or tucked neatly around a seat handle, these strawberry and daisy-themed hangers turn small spaces into bursts of creativity and joy. A perfect balance of decorative appeal and clever usability, these handmade crochet treasures make driving more delightful while highlighting your unique style.
How To Crochet Amigurumi Cherry And Daisy
Materials Needed
- Crochet hook (size 4mm)
- Medium yarn in red, green, white, and yellow
- Scissors
- Darning needle
- Hot glue gun
- Stuffing

Step-by-Step Instructions
1. Crochet the Strawberry Base
- Start with a Magic Circle:
- Create a magic circle and chain one. (If unfamiliar with magic circles, refer to the creator's reel for guidance).
- Single crochet 4 stitches into the magic circle.
- Close the Circle:
- Pull the yarn to close the circle.
- Slip stitch into the first stitch to secure, then chain one.
- Increase Rows:
- For the second row, crochet two single crochets into the first stitch (increase).
- Follow this pattern: one single crochet, then increase to the end of the row.
- Slip stitch into the first stitch, then chain one.
- Continue Stitching and Increasing:
- Third row: Crochet two single crochets in the starting stitch, followed by two single crochets and one increase. Repeat to complete the row.
- Shape the Strawberry Rows:
- Crochet three rows of single crochet. Slip stitch and chain one at the end of each row.
- Crochet three rows of single crochet. Slip stitch and chain one at the end of each row.
- Decrease Rows to Close the Base:
- Row 1: Two single crochets, then decrease. Repeat until the end of the row.
- Row 2: One single crochet, then decrease. Repeat around.
- Finish the Base:
- Slip stitch, chain one, and cut the yarn. Use stuffing to fill the strawberry. Shape as desired for a smooth, rounded look.
- With a darning needle, weave through the front loops of the last row to close the top and secure.
2. Create the Green Strawberry Top
- Magic Circle and First Row:
- Use green yarn to make a magic circle.
- Chain one and single crochet five stitches into the circle. Pull to close.
- Petal Formation:
- Slip stitch into the first chain, then chain 4.
- For the petal: Single crochet into the second chain, then crochet 3 single crochets up the chain. Slip stitch into the next stitch.

- Continue Adding Petals:
- Repeat the petal pattern around the circle until five petals are formed.
- Slip stitch, chain one, and leave a tail for sewing.
- Attach Top to Strawberry:
- Use a darning needle to sew the green top to the strawberry base, weaving and securing as needed.
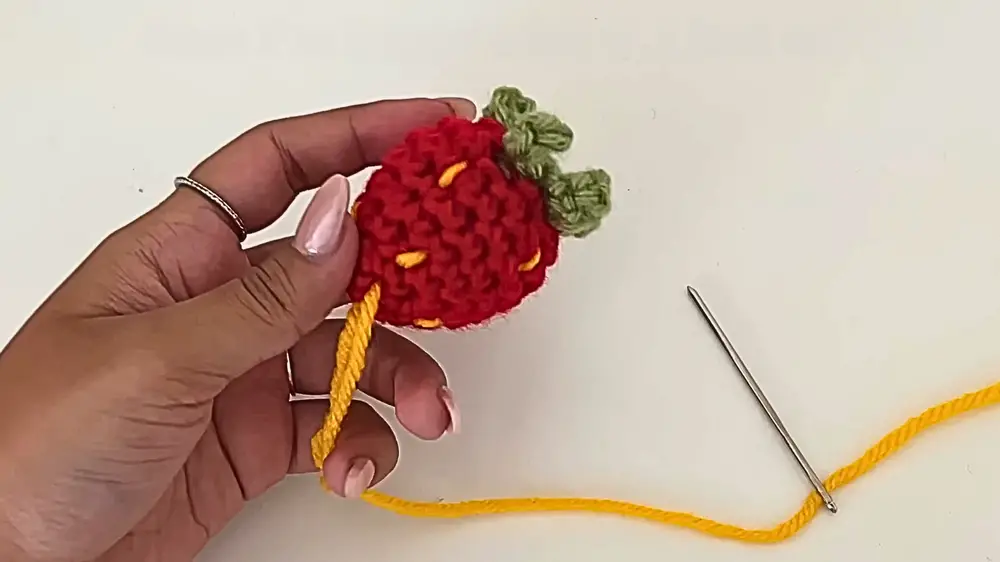
3. Add Yellow Seeds to the Strawberry
- Cut a long piece of dark yellow yarn.
- Use the darning needle to stitch small seed-like patterns randomly across the strawberry.
- Secure the yarn ends, hide them within the strawberry, and cut excess.
4. Create the Flower
- Yellow Center:
- Make a magic circle using yellow yarn.
- Chain one and crochet five single crochets into the circle. Pull to tighten.
- White Petals:
- Attach white yarn to the yellow circle.
- Chain three, yarn over, and make puff stitches into the same stitch. Each petal consists of 4 puff crochet repeats.
- Slip stitch into the next stitch to secure the petal.
- Repeat around the yellow circle to create five petals.

- Green Base of Flower:
- With green yarn, create a magic circle and add five single crochets inside it. Pull to close.
- Slip stitch and chain one. Secure and cut yarn, leaving a tail for sewing.
- Assembly:
- Attach the green base to the back of the white flower using a darning needle.
- Secure it to the strawberry's top with knots and glue if needed.
5. Add the Hanging Chain
- Use green yarn to chain 60 stitches.
- Leave a tail of yarn on both ends of the chain for attaching.
- Secure the chain by weaving it into the top of the strawberry and knotting it into place.

Conclusion
This crochet strawberry car hanger is a delightful way to add charm to your car while honing your crochet skills. The combination of the red strawberry base, green top, yellow seeds, and white flower makes for a cute, handmade decoration. Whether you're making it for yourself or as a gift, this creative project is sure to impress!