
Functional decor meets whimsy in our Free Crochet Adorable Hanging Basket Pattern; create charming, practical storage solutions to enhance your home!
Crochet Adorable Hanging Basket
Beautiful standalone pieces, our hanging baskets bring a touch of elegance and functionality to your home. These baskets captivate with their intricate stitch patterns and charming textures, which add depth and allure to any room. Available in an array of colors and sizes, they effortlessly adapt to various interiors, be it contemporary or bohemian.

These baskets are not just eye-catching; they provide practical storage for kitchen supplies, bathroom essentials, or nursery toys, proving that style can indeed meet functionality. Hung gracefully against walls or from hooks, their aesthetic appeal transforms and uplifts the surrounding space. Their unique appearance ensures they are both a focal point and a harmonious addition to your decor.
Tip:
Choose colors that complement your room's palette for a cohesive look.

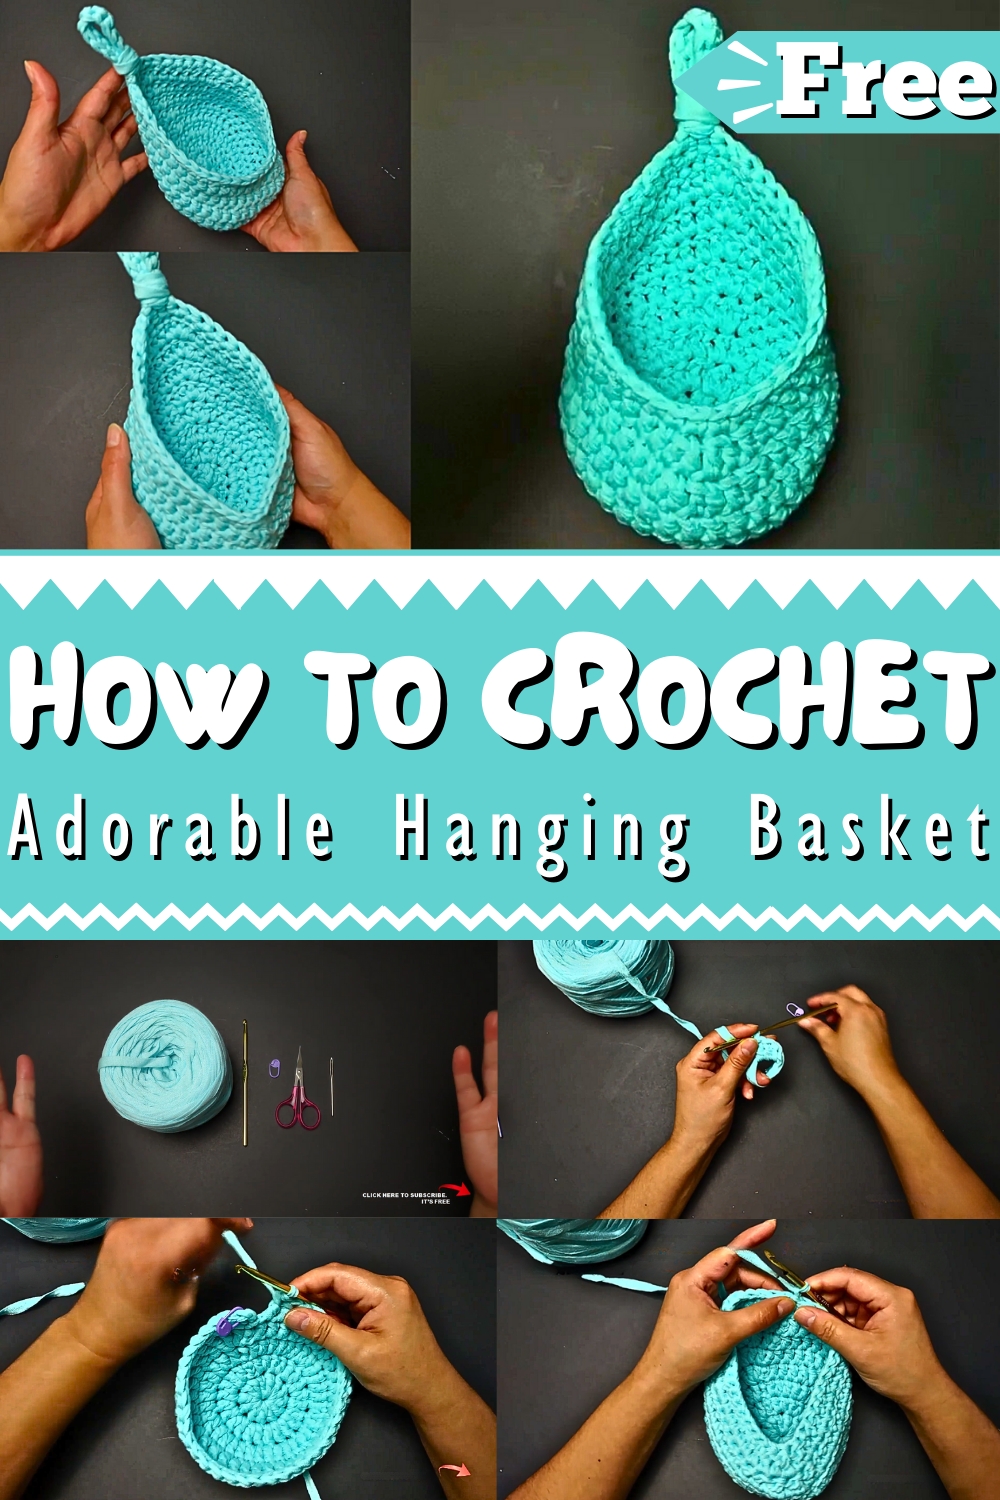
Crochet Mini Hanging Teardrop Basket - Step by Step Guide
Introduction
Making a mini hanging teardrop basket. This basket is easy to create, works up quickly, and is an updated version of a previous pattern.
Materials Needed
- Yarn: 100% cotton ribbon yarn from hobby.com (bulky type).
- Crochet Hook: Size H8 or 5mm.
- Other Tools: A stitch marker, scissors, and a large tapestry needle.

Instructions
Round 1
- Magic Circle: Start with a magic circle and chain two (these chains do not count as stitches).
- Double Crochets: Place 12 double crochets into the ring.
- Slip Stitch: Slip stitch to the first stitch, making sure you have 12 stitches.
Round 2
- Chain Two: Begin the round with a chain two.
- Increases: Place two double crochets in each stitch around (24 stitches total).
Round 3
- Pattern: One double crochet in the first stitch, two double crochets in the next stitch. Repeat around for a total of 36 stitches.
- Finish: Slip stitch to the first stitch and chain two.\

Round 4
- Start Shaping: Three double crochets in the first stitch, mark the start, and double crochet in the next 35 stitches (38 stitches in total).
Round 5
- Continue Shaping: Double crochet in the first stitch, mark it, then three double crochets in the next stitch. Double crochet around for a total of 40 stitches.
- Finish: Slip stitch to the first stitch and chain two.
Round 6
- Another Increase: Double crochet in the first two stitches, then three double crochets in the third stitch. Double crochet around (42 stitches total).
Round 7
- Start Decreasing: Double crochet in the next three stitches, then place three double crochets in the fourth stitch. Double crochet in the next 16 stitches.
- Decreases: Decrease in the next three sets of two stitches (three decreases).
- Stitches: Double crochet in the next 16 stitches to complete the round (41 stitches total).
Round 8
- Increase and Decrease: Double crochet in the four stitches, then place three double crochets in the fifth stitch. Double crochet in the next 15 stitches.
- Decreases: Perform three decreases, as above.
- Stitches: Double crochet in the next 15 stitches to complete the round.

Round 9
- Single Crochets: Chain one and single crochet in each stitch around (40 stitches total).
Creating the Hanging Loop
- Slip Stitches: Slip stitch across five stitches to reach the center of the bag.
- Chain: Chain 12 for the loop.
- Secure: Slip stitch to the next two stitches, turn, and single crochet back down the chain.
- Finish: Slip stitch to the next stitch and fasten off.
Wrapping the Loop
- Extra Yarn: Leave about 24 inches of thread for wrapping.
- Form Loop: Create a loop with your tail and wrap the loop multiple times.
- Secure: Pass the tail through the loop and tighten. Use the tapestry needle to hide the end within the wraps.
Weaving in Ends
- Tapestry Needle: Use the needle to weave in the ends, making sure the basket is neat and secure.
Conclusion
Your mini hanging teardrop basket is complete! You can use it to hold small plants or other decorative items. This basket is both practical and charming.


