
Be amazed at these Free Crochet 3D Granny Squares Patterns that infuse joy and creativity into your projects with unique and unforgettable designs!
Crochet 3D Granny Squares
Offering a delightful twist on a beloved classic, granny redefine the aesthetics and possibilities of traditional crochet squares. Their dynamic designs provide a multi-dimensional appearance, adding depth and texture to any project. The beauty of these patterns lies in intricate details and how they elevate ordinary cushions, blankets, or wall hangings into eye-catching masterpieces. Each square becomes a small piece of art, featuring raised surfaces, flowery motifs, or geometric designs that play with light and shadow, creating a lively and vibrant effect.

The kaleidoscope of colors and textures available allows for limitless creativity, making it easy to personalize your creations. These patterns are not only visually enchanting but also offer a refreshing challenge for those wishing to expand their crochet skills beyond the basics. Infuse sophistication and innovation into your home décor or handmade gifts.
Tip:
Always block your squares to achieve uniformity and a polished finish.
How To Crochet 3D Granny Squares
Michelle discusses the variety of patterns available in the book, including food, animals, and flowers. She notes that the squares are larger and more three-dimensional than traditional granny squares, making them great for items like pillows and blankets.
Selected Patterns and Yarn
Michelle outlines the three specific patterns she will be making and the yarns chosen for each:
- Pie
- Sheep
- Layered Flower
She describes the colors and yarn types (Estelle Worsted and others) sourced from The Creative Knitter shop.
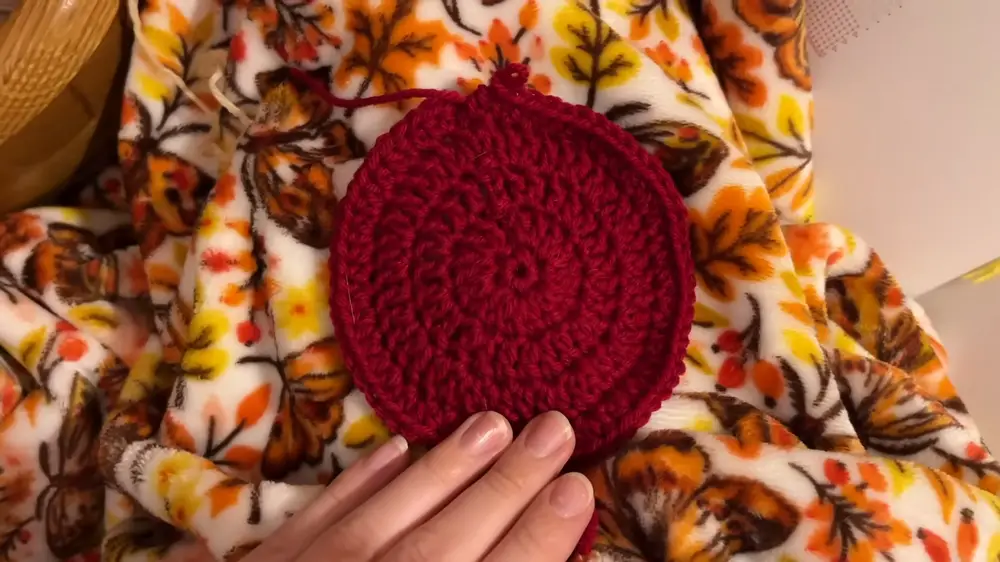
Making the Pie Square
Steps
- Starting the Center:
- Use a red yarn and a 4.5 mm crochet hook to make a circle at the center.
- Creating the Crust:
- Switch to a pie crust color to make a row around the center red circle.
- Scallop Edge:
- Create a scallop edge around the crust, aiming for a pie-like appearance.
- Background:
- Add the white background by attaching it from the back.
- Finishing:
- Complete the granny square using double crochets.
- Complete the granny square using double crochets.
Challenges
- Ensuring the scallop edges and white background align properly.
- The appearance of the finished scallop edge and ensuring it resembles a pie.

Making the Sheep Square
Steps
- Creating the Center:
- Begin with a circle using appropriately chosen yarn colors.
- Popcorn Stitch Learning:
- Learn and apply the Popcorn Stitch to create the 3D texture for the sheep.
- Creating Popcorn Stitches:
- Use five double crochets per stitch, pull through the first and last loops, chain one to complete the popcorn effect.
- Forming the Rows:
- Two rows of popcorn stitches around to form the texture.

- Two rows of popcorn stitches around to form the texture.
- Correcting Stitch Count:
- Adjust mistakes by recounting and ensuring the row stitches add up correctly by skipping chains if needed.
- Border:
- Crochet the border, converting the circle into a square using double crochets.
- Finishing:
- Add details of legs, ears, and face to the sheep.
Challenges
- Understanding the Popcorn Stitch and managing stitch counts.
- Adjusting to ensure the 3D effect is accurate and resembles the actual sheep.

Making the Layered Flower Square
Steps
- Creating the Flower Center:
- Start with a yellow yarn puff stitch for the center.
- Adding Layers:
- Build layers with different colored yarns (purple and pink) using the puff stitch technique.
- Forming the Outer Layers:
- Create the back layer using single crochets and half-double crochets.
- Combining Layers:
- Connect the different layers properly to maintain the flower's 3D effect.
- Finishing:
- Complete the granny square by adding a border.
Challenges
- Understanding the puff stitch and ensuring all flower layers align correctly.
- Maintaining consistent tension for the petals to create a uniform flower.
Mounting the Squares
Steps
- Preparing the Shadow Boxes:
- Remove the glass from $5 Dollarama shadow boxes.
- Attaching the Squares:
- Sew the squares onto felt backing that fits the shadow boxes.
- Secure the squares without glue to ensure they can be easily removed if needed.
- Final Adjustments:
- Adjust any last-minute placement issues, ensuring the squares fit snugly.

- Adjust any last-minute placement issues, ensuring the squares fit snugly.
Challenges
- Correctly mounting and securing the squares to maintain their 3D shape and appearance.
Conclusion
Satisfy with the outcome of the 3D granny squares and their display. The pie square is everyone favorite due to its adorable and realistic appearance. The sheep square, with its tactile 3D body, is loved for its plush look. The flower square, while challenging, turned out beautifully and was worth the effort.


